Cute Halloween Apothecary Patterns
If you’ve ever scrolled through design marketplaces searching for Halloween-themed graphics that feel both playful and polished—neither too childish nor overly gothic—you know how rare it is to find something that lands just right. Cute Halloween Apothecary Patterns fills that gap beautifully: a thoughtfully curated, seamless digital pattern collection designed for real-world creative work—not just aesthetic scrolling.
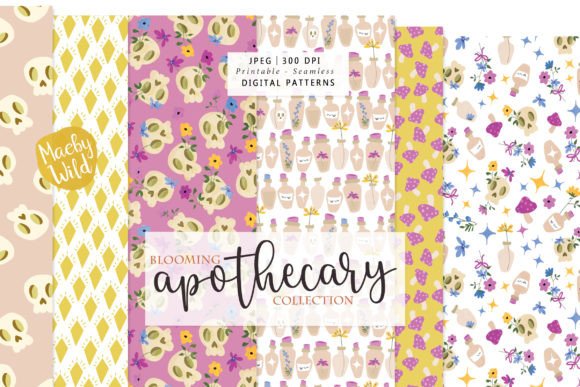
The Blooming Apothecary Collection isn’t just another set of spooky clipart. It’s six high-resolution JPEG patterns built for flexibility: think whimsical skulls nestled among blooming florals, apothecary bottles with delicate labels, clusters of friendly mushrooms, and soft botanical repeats—all crafted to scale cleanly, tile seamlessly, and layer gracefully across projects. Whether you’re designing printable party invites, crafting Instagram story templates, prepping classroom decorations, or building branded merch for your small shop, these patterns help you move from idea to finished piece in minutes—not hours.
Common Missteps—and How to Avoid Them
Even experienced designers sometimes overlook subtle but important details when working with digital patterns like Cute Halloween Apothecary Patterns. Here’s what trips people up—and how to sidestep those pitfalls.
Assuming “seamless” means “plug-and-play in any software”
Seamless tiling is a technical feature—but how well it works depends on your tool. Some apps (like Canva) handle JPEG patterns smoothly when uploaded as backgrounds. Others (like older versions of Photoshop or certain Cricut Design Space workflows) may require extra steps—like converting to PNG with transparent edges or adjusting canvas alignment manually. Skipping this check can lead to visible seams, misaligned repeats, or frustrating trial-and-error resizing.
Better approach: Before starting your main project, test one pattern in your intended software at actual size. Zoom in along the edges—if you see a hard line or color shift where tiles meet, adjust your repeat method or consult the app’s pattern-fill settings. Most modern tools support “pattern overlay” or “tile fill” modes—use them instead of stretching a single JPEG across large areas.
Overlooking resolution needs for print vs. digital use
These patterns are delivered as JPEGs—ideal for web use, social media, and digital scrapbooking. But if you plan to print invitations, stickers, or fabric transfers, resolution matters. At 300 DPI and full-size dimensions (typically 4000×4000 px), they hold up well for standard print sizes (5×7", A6, letter). However, blowing them up to poster size without checking pixel density can cause softness or blurriness—especially noticeable in fine details like mushroom gills or bottle etchings.
Better approach: For print, open your chosen pattern in an image editor and check Image > Image Size. Confirm resolution is set to 300 PPI *before* scaling. If enlarging beyond 12×12", consider using vector-based alternatives—or contact the creator (Maeby Wild) to ask about SVG or high-res TIFF options, if available.
Mixing patterns without considering visual weight
With six distinct designs—including bold skull-floral combos and airy mushroom repeats—it’s tempting to layer them all. But overcrowding dilutes impact. Using three busy patterns on one card, for example, competes for attention and weakens hierarchy—making text harder to read and themes harder to parse.
Better approach: Treat each pattern like a voice in a conversation. Let one take center stage (e.g., a skull-and-rose background for an invitation), then use quieter accents elsewhere (a subtle mushroom border, or a bottle motif as a corner element). Try desaturating or lightening secondary patterns by 20–30% to keep focus where it belongs.
Skipping file organization before downloading
It’s easy to download the ZIP, unzip, and jump straight into design—only to realize later you’ve lost track of which file is which pattern, or overwritten a favorite variation. Since these are JPEGs (not layered PSDs), renaming helps more than you’d think—especially when juggling multiple clients or seasonal projects.
Better approach: As soon as you extract the files, rename them meaningfully: blooming-apothecary-skulls-light.jpg, apothecary-bottles-soft.jpg, etc. Add a quick note in your project folder about intended uses (“Great for cupcake toppers + email headers”). You’ll save time next October—and avoid re-downloading or guessing.
What to Check Before You Buy or Use
Before adding Cute Halloween Apothecary Patterns to your cart—or diving into your first project—take two minutes to verify these points:
- Licensing scope: This collection is for personal *and* commercial use—meaning you can sell physical items (like mugs or prints) made with the patterns, as long as you don’t resell the files themselves or claim them as your own original art.
- Format clarity: These are JPEGs only—not editable vectors or layered source files. If you need to recolor individual elements (e.g., change a skull from black to purple), you’ll need basic photo-editing skills or tools like Photoshop’s Select Subject + Hue/Saturation adjustment.
- Color mode: Files are RGB—perfect for screens and most home printers. If you're sending to a professional print shop that requires CMYK, convert *after* final layout (not before), and soft-proof colors to avoid unexpected shifts in floral pinks or bottle glass tones.
- Creator support: Maeby Wild offers direct message support. If you’re unsure whether a pattern suits your niche (e.g., “Will the mushroom design read well on dark kraft paper?”), ask. Real-time feedback beats assumptions every time.
Remember: great design isn’t about having the most assets—it’s about using the right ones intentionally. Cute Halloween Apothecary Patterns shines when treated as a thoughtful toolkit, not just decorative wallpaper. Its charm lies in balance: the contrast of sweet florals and gentle spookiness, the harmony of vintage apothecary detail and modern usability, and the ease of jumping in—without needing advanced skills or endless tutorials.
So whether you’re drafting your first Halloween newsletter, prepping a teacher’s lounge bulletin board, or launching a seasonal product line—start with intention, test early, and let the patterns do the whimsy for you. And if something feels off? Pause, check the details above, and reach out. Happy creating—maybe a little wild, always intentional.